Intro to PHP and MySQL
Class 3
Welcome!
Girl Develop It is here to provide affordable and accessible programs to learn software through mentorship and hands-on instruction.
Some "rules"
- We are here for you!
- Every question is important.
- Help each other.
- Have fun.
MySQL
WAMP/MAMP includes three components
- Apache - A web server
- MySQL - Database software
- PHP - The PHP processor
We have been using Apache and PHP. Today, we'll learn about MySQL.
Today's code
We'll be looking at a lot of code today. You can download a copy to work from, as a txt file or a zip file.
A database is a way to store information...
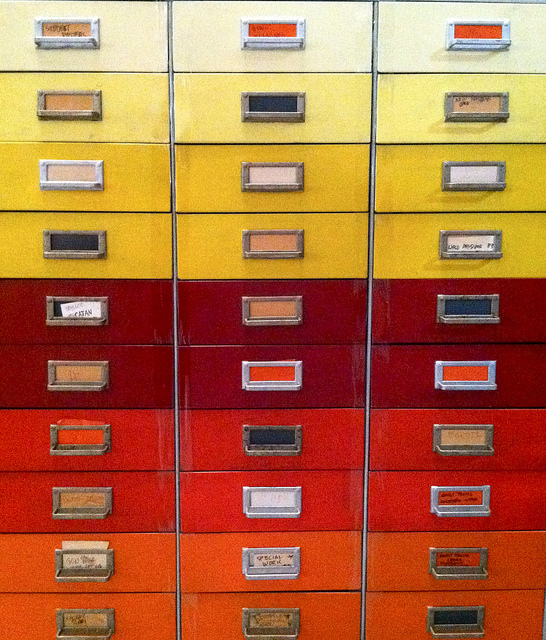
Photo credit: victoriabernal cc
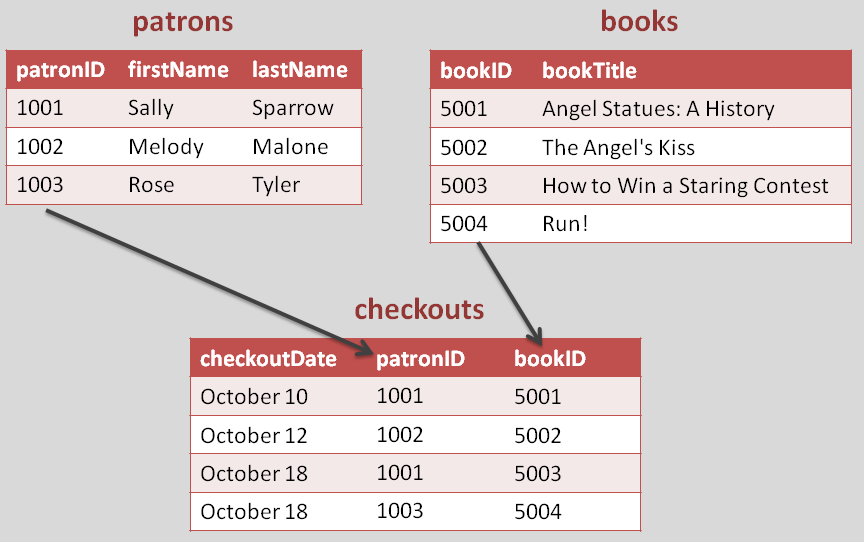
...and link it together

Photo credit: skittledog cc
Data are stored in linked tables

Photo credit: Antony Oliver cc
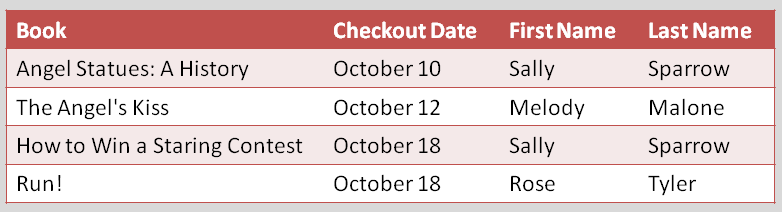
Instead of one giant, repetitive table...
...you break things into smaller tables
Why?
- Thoroughness
- Consistency
- Avoiding human error
- Working with dynamic content
What is MySQL?
- A relational database
- Query-driven
- BFFs with PHP
MySQL data types
- VARCHAR - String up to 256 characters
- INT - Integer of up to 11 characters
- FLOAT - Decimal of any size
- TEXT - Large amounts of text, no limit in size
- DATE / TIME - date entries with specific formats
Working with MySQL
Most relational databases, including MySQL, use a language called SQL (Structured Query Language). Here are some basic commands:
- SELECT - get data from a database table
- UPDATE - change data in a database table
- DELETE - remove data from a database table
- INSERT INTO - insert new data in a database tab
Walkthrough
We will create a database for a coffee shop

Photo credit: Ahmed Rabea cc
Let's Develop It
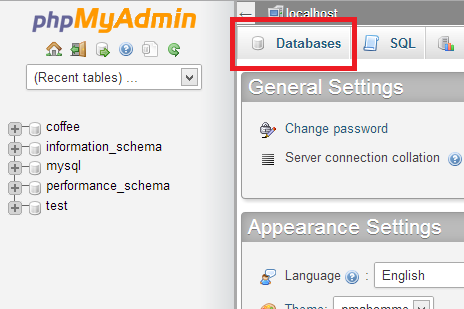
Let's create our first database. Start up WAMP/MAMP and go to http://localhost/phpmyadmin/ (Windows) or http://localhost:8888/phpmyadmin/ (Mac)
The default username is "root". The default password is either "" (i.e., leave it blank) or "root".
Find the Database Option
C:\wamp\bin\mysql\mysql15.6.12\bin>mysql.exe -u root
Create a new DB called "coffee"
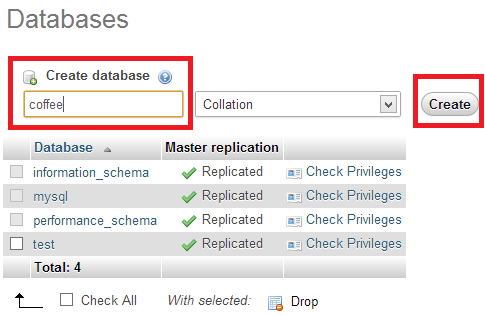
CREATE DATABASE coffee;
Select your database
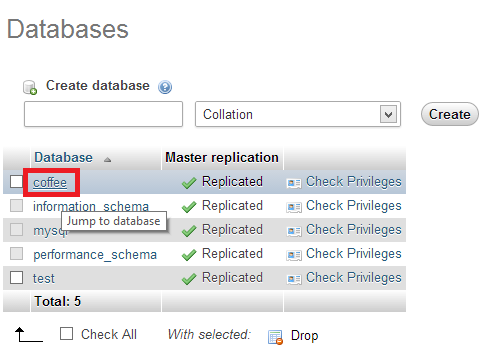
USE coffee;
Create a table called "product"
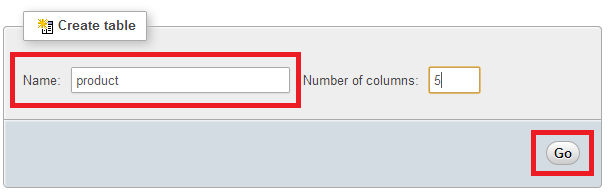
CREATE TABLE product (
  productID int,
  company varchar(255),
  type varchar(255),
  roast varchar(255),
  description text
);
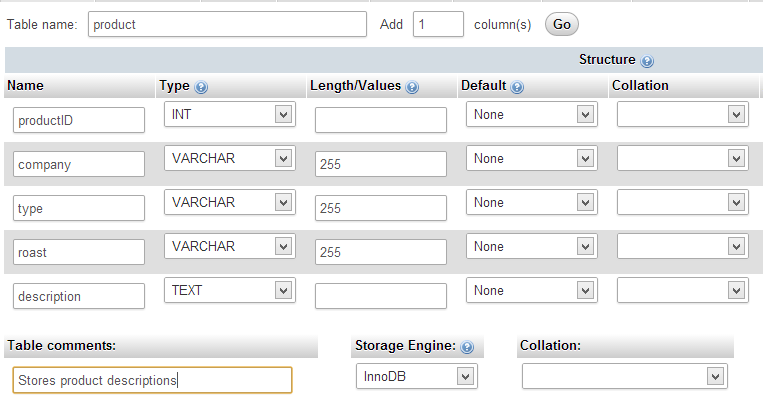
Add your columns
- productID - int
- company - varchar - 255
- type - varchar - 255
- roast - varchar - 255
- description - text - 255
Add your columns
Let's get connected
Create a new file called db.inc.php and place it in the same folder as index.php
$link=mysqli_connect ('localhost', 'root', '');
if  (!$link){
  $output='Unable to connect to the database';
  echo $output;
  exit();
}
if (!mysqli_set_charset($link,'utf8')) {
  $output = 'Unable to set database connection encoding.';
  echo $output;
  exit();
}
if (!mysqli_select_db($link, 'coffee')){
  $output = 'Unable to locate the database.';
  echo $output;
  exit();
}
What just happened?
We connected to MySQL with our username and password, set our character set (the group of characters we will use), and chose the coffee database. We included some error messages as needed.
Adding data
You add data to a MySQL database with a statement like this:
INSERT INTO table_name
VALUES (value1,value2,value3,...);
But first, we have to collect some data from our users
Let's make a form!
<form action="product_insert_result.php" method="get">
  Company: <input type="text" name="company"/><br/>
  Type: <input type="text" name="type"/><br/>
  Roast:
  <input type="radio" name="roast" value="light">Light</input>
  <input type="radio" name="roast" value="medium">Medium </input>
  <input type="radio" name="roast" value="dark">Dark</input>
  <br/>
  <textarea name="description" rows="10" cols="40"></textarea><br/>
  <input type="submit" value="Submit"/>
</form>
What just happened?
We made a basic HTML form to collect some data, and then send it to the file product_insert_result.php. Of course, that does not exist yet.
Form processing
Create a new file called product_insert_result.php and place it in the same folder as index.php
include 'db.inc.php';
$company = mysqli_real_escape_string($link, $_GET['company']);
$type = mysqli_real_escape_string($link, $_GET['type']);
$roast = mysqli_real_escape_string($link, $_GET['roast']);
$description = mysqli_real_escape_string($link, $_GET['description']);
What just happened?
We used an include command to reuse our "connect to DB" code. Then, we assigned the values from the form to variables. We used the command mysqli_real_escape_string to prep the data for MySQL, so it won't barf it back.
Inserting data
Right below the previous code, add:
$sql = "INSERT INTO product SET
company='$company',
type='$type',
roast='$roast',
description='$description'";
if (!mysqli_query($link, $sql)){
  $error = 'Error adding submitted data: '
  . mysqli_error($link);
  echo $error;
  exit();
}
header('Location:product_show.php');
What just happened?
We created a string called $sql and used it to build an SQL statement. (Note the careful use of quotes!) We then passed that string to the database, with an error message just in case. Finally, we told the form to send the user to product_show.php.
Let's get our coffee back!

Photo credit: Jason Chamberlain cc
Retrieving data
You retrieve data from a MySQL database with a statement like this:
SELECT column_name(s)
FROM table_name;
Building the select statement
Create a new file called product_show.php and place it in the same folder as index.php
include 'db.inc.php';
$sql='SELECT productID, company, type, roast, description
FROM product ORDER BY productID DESC';
$result = mysqli_query($link, $sql);
if (!$result) {
  $error = 'Error fetching data: ' . mysqli_error($link);
  echo $error;
  exit();
}
What just happened?
Again, we used the include to reuse code. We followed the same process as before to send a request to the DB; make a statement, send it to the DB, and include an error message. We stored the results in a variable called $result.
Displaying data
Right below the previous code, add:
while($recording=mysqli_fetch_array($result)){
  $id=htmlspecialchars($recording['productID'],
  ENT_QUOTES, 'UTF-8');
  $company= htmlspecialchars($recording['company'],
  ENT_QUOTES, 'UTF-8');
  $type=htmlspecialchars($recording['type'],
  ENT_QUOTES, 'UTF-8');
  $roast=htmlspecialchars($recording['roast'],
  ENT_QUOTES, 'UTF-8');
  $description=htmlspecialchars($recording['description'],
  ENT_QUOTES, 'UTF-8');
  echo $company . ' ';
  echo $type . ' ';
  echo $roast . ' ';
  echo $description . '<br />';
}

echo 'Return to home.'
What just happened?
Return of the loop! We used a while loop to go through the results and put them out on the screen. The htmlspecialchars function helps clean the data. Then, we added a link back to the home page.
You did it!

Resources
- PHP Manual, the official PHP documentation. Check the comments; they are useful.
- Code Academy, with interactive PHP lessons to help you review.
- W3Schools SQL Tutorial, a great guide to basic SQL.