Introduction to JavaScript
Class 4
Let's Review

Anatomy of a Website
Your Content
+ HTML: Structure
+ CSS: Presentation
= Your Website
A website is a way to present your content to the world, using HTML and CSS to present that content & make it look good.
HTML is Markup
Photo credit: Nic's events cc
CSS is Style
Photo credit: pumpkincat210 cc
IDs vs Classes
ID - Should only apply to one element on a webpage, i.e., you might have an id of banner on your webpage's banner.
The # is how you find ids in CSS.
Class - Lots of elements can have the same class, i.e., There can be many elements with a warning class on one webpage.
The . is how you find classes in CSS.
Nesting
HTML elements "nest" inside one another

The DOM Tree: Sample Code
Oftentimes, people think of HTML as something flat -- a bunch of text with tags in the middle.
<!DOCTYPE html>
<html>
  <head>
    <title>Test Page</title>
    <style>
      h1 {
        color: red;
      }
    </style>
  </head>
  <body>
    <h1>My Page</h1>
    <p>Hello World!</p>
    <img src="http://placekitten.com/g/200/300" alt="cat"/>
  </body>
</html>
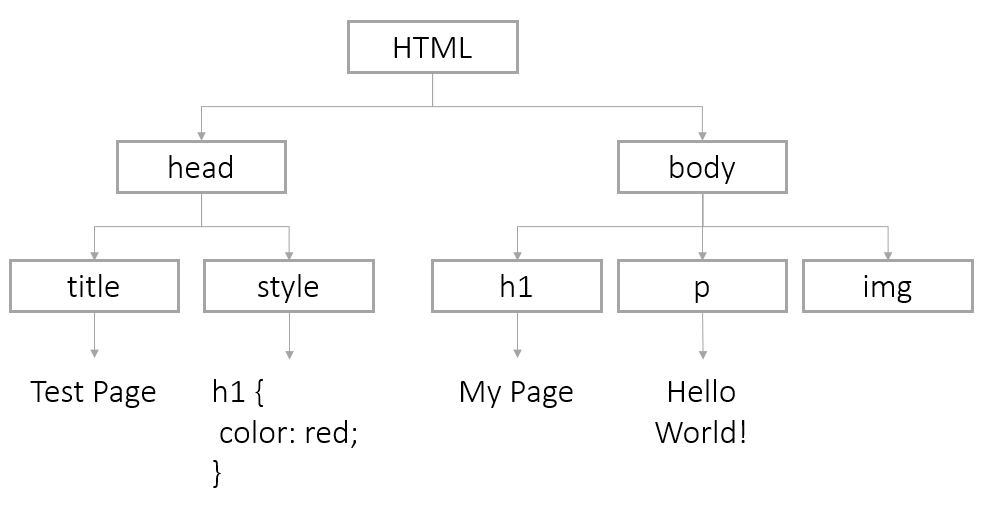
The DOM Tree: Sample Model
However, it is something much more than that. Any HTML document is a tree structure defined by the DOM (Document Object Model).
DOM Access
Your browser automatically loads the content of a webpage into a Document object which serves as the entry point into a web page's content.
Using the document you can:
- Change the content tree any way you want.
- Build an HTML document from scratch.
- Access or replace any existing DOM nodes (HTML elements in the DOM).
Finding Nodes
Photo credit: Jeffery Beall cc
DOM Access: By Id
You can find nodes by id using the method:
document.getElementById(id);
For example, to find:
<img id="kittenPic" src="http://placekitten.com/g/200/300" alt="cat"/>
We would use:
var imgKitten = document.getElementById('kittenPic');
DOM Access: By Tag Name
You can also get HTML elements by their tag using this method:
document.getElementsByTagName(tagName);
To find:
<ul>
  <li>Daisy</li>
  <li>Tulip</li>
</ul>
We would use:
var listItems = document.getElementsByTagName('li');

for (var i = 0; i < listItems.length; i++) {
  var listItem = listItems[i];
}
DOM Access: HTML 5
In newer browsers, you can use methods getElementsByClassName, querySelector, and querySelectorAll.
Available in IE9+, FF3.6+, Chrome 17+, Safari 5+:
document.getElementsByClassName(className);
Available in IE8+, FF3.6+, Chrome 17+, Safari 5+:
document.querySelector(cssQuery);
document.querySelectorAll(cssQuery);
getElement vs. getElements
Any method that starts with getElement will return a single node.
document.getElementById('uniqueID'); // returns a single node
Any method that starts with getElements will return an array of nodes. To modify a single node, you will need to use bracket notation to get the correct one.
document.getElementsByTagName('p'); // returns multiple nodes

var specificParagraph = document.getElementsByTagName('p')[2];
Changing Nodes

Photo credit: Darryl Kenyon cc
DOM Nodes: Attributes
You can access and change attributes of DOM nodes using dot notation.
To change this element:
<img id="kittenPic" src="http://placekitten.com/g/200/300" alt="cat"/>
We could change the src attribute this way:
var imgKitten = document.getElementById('kittenPic');

// will return src attribute on image
imgKitten.src

// will set our src to a new src
imgKitten.src = 'http://placekitten.com/g/600/500';
DOM Nodes: Getting and Setting Attributes
You can also use getAttribute or setAttribute
<img id="kittenPic" src="http://placekitten.com/g/200/300" alt="cat"/>
We could change the src attribute this way:
var imgKitten = document.getElementById('kittenPic');

// will return src attribute on image
imgKitten.getAttribute('src');

// will set our src to a new src
imgKitten.setAttribute('src', 'http://placekitten.com/g/600/500');
DOM Nodes: Styles
You can change page css using style
To make this CSS:
body {
  color: red;
}
Use this JavaScript:
var pageBody = document.getElementsByTagName('body')[0];

pageBody.style.color = 'red';
DOM Nodes: More Styles
The rule of thumb in JavaScript is to change CSS styles with a "-" to camelCase.
To make this CSS:
body {
  background-color: pink;
  padding-top: 10px;
}
Use this JavaScript:
var pageBody = document.getElementsByTagName('body')[0]

pageBody.style.backgroundColor = 'pink';

pageBody.style.paddingTop = '10px';
Let's Develop It
Create a simple HTML page or use this sample code.
Isolate a node (an element on the page) and change an attribute or add a new style.
DOM innerHTML
Each DOM node has an innerHTML property with the HTML and content of its children. You can use the property to view or change the HTML of a node.
For example, you can overwrite the entire body:
var pageBody = document.getElementsByTagName('body')[0];

pageBody.innerHTML = '<h1>Oh Noes!</h1><p>I changed the whole page!</p>'
Or just add some new content to the end
pageBody.innerHTML += '...just adding this at the end of the page.';DOM innerHTML continued
You can also target one specific element's content
To put content in this paragraph element:
<p id="warning"></p>We can select the node and modify it
var warningParagraph = document.getElementById('warning');

warningParagraph.innerHTML = 'Danger Will Robinson!';
Creating New Nodes
The document object also has methods to create nodes from scratch:
document.createElement(tagName);

document.createTextNode(text);

element.appendChild(element);
Creating New Nodes: Sample Code
var pageBody = document.getElementsByTagName('body')[0];

// create our image tag with attributes
var newImg = document.createElement('img');
newImg.src = 'http://placekitten.com/g/500/200';
newImg.style.border = '1px solid black';

// add our image to the body
pageBody.appendChild(newImg);

// create a paragraph tag with content
var newParagraph  = document.createElement('p');
var paragraphText = document.createTextNode('Squee!');
newParagraph.appendChild(paragraphText);

// add our new paragraph to the body
pageBody.appendChild(newParagraph);
Let's Develop It
Create a new paragraph element and add it to a div on your page.
Events

Events
An event is an object that is sent when actions take place on your webpage, most often when a user interacts with your webpage.
For example, JavaScript creates an event when a user clicks an element.
element.addEventListener('click', function(event) {
  // code to be executed when user clicks
});
Types of Events
There are a variety of events. Some of the more common events are:
- click: Occurs when the user clicks on an element
- mouseover: Occurs when the pointer is moved onto an element
- mouseout: Occurs when the pointer is moved off an element
- keyup: Occurs when the user releases a key
- load: Occurs when a document has been loaded
- focus: Occurs when an element gets focus
- blur: Occurs when an element loses focus
Calling Functions from HTML
You can call a function directly from your HTML code:
<button id="myBtn" onclick="sayHi()">Click Me!</button>
function sayHi (event) {
  alert('Hi!');
};
Calling Functions from JavaScript
You can call a function from the addEventListener:
<button id="myBtn">Click Me!</button>
var button = document.getElementById("myBtn");

button.addEventListener("click", function (event) {
  alert("Hi!");
});
or
var button = document.getElementById("myBtn");

var sayHi = function (event) {
  alert("Hi!");
};

button.addEventListener("click", sayHi);
Let's Develop It
Go back to the sample files you downloaded earlier.
Make some JavaScript code fire after a mouseover event.
Preventing Defaults
Preventing Defaults
Elements like links and checkboxes have default behaviors determined by the browser. However, the event object has a built-in method to prevent the default behavior
Our anchor link in HTML
<a id="myLink" href="https://www.girldevelopit.com">GDI</a>
Code to prevent going to link's href on click
var link = document.getElementById("myLink");

link.addEventListener("click", function(event) {
  event.preventDefault();
});
currentTarget
Photo credit: Alan Berning cc
currentTarget
The event's currentTarget references the element the event listener was attached to.
Our button in HTML:
<button id="myBtn">Click Me!</a>This code adds styles and text to our clicked button
myButton = document.getElementById("myBtn");

myButton.addEventListener("click", function(event) {
  btn = event.currentTarget;

  btn.style.backgroundColor = 'red';
  btn.innerHTML = 'Clicked!';
};
You may also see code that references the keyword this as the "target".
Let's Develop It
Write code that targets this link:
<a href="http://girldevelopit.com/" id="gdiLink">Girl Develop It</a>
When a user clicks the link, the page should display an error message instead of going to the Girl Develop It homepage.
User Input
Photo credit: Rym DeCoster cc
Forms
You can collect information from users to use in your code. The most common method is an HTML form
<form id="userForm">
  <label for="name">First Name:</label>
  <input type="text" id="firstName"/>
  <input type="radio" name="married" value="Yes" checked /> Yes
  <input type="radio" name="married" value="No" /> No
  <input type="submit" id="submitBtn" value="Submit" />
</form>
Retrieving Form Data
You retrieve the values of form elements using the value method.
var name = document.getElementById('firstName').value;
console.log(name);
You can retrieve the value of a form at any time. Even when an event like blur is triggered (when a form element loses focus).
Radio Buttons
Radio buttons usually do not have IDs, so you will need to use a for loop to get the value on each radio:
var radios = document.getElementsByName('married');

var length = radios.length;

for (var i = 0; i < length; i++) {
  if (radios[i].checked) {
    var radioButtonValue = radios[i].value;
    // only one radio can be checked, so stop now
    break;
  }
}
Submit buttons
If you are going to retrieve form values with the submit button, be sure to prevent the default action!
var submitButton = document.getElementById('submitBtn');

submitButton.addEventListener("click", function(event) {
  event.preventDefault();

  var name = document.getElementById('firstName').value;
  console.log(name);
})
Let's Develop It
Collect a value from the input box on the page. Use it inside a function of some kind. For example, collect a number and multiply it by five or collect a name and display a greeting.
You did it!

Resources
- JavaScript Guide, from the Mozilla Developers Network.
- Code Academy, with interactive JavaScript lessons to help you review.
- Khan Academy has a lot more information abut drawing and animations.